Can you install an Apple VLM model on a Windows system?
Beside a couple of other products that look promising like the Airpod pro 3 (reportedly with live translation). Apple also released, a little bit before, a series of VLM models on huggingface, the FastVLM series:
Problem: its license is extremely restrictive
Second problem: which version of FastVLM are we talking about?
The version of fastVLM on github (with a different license)? Or the one on huggingface because it seems like the models are not exactly the same (September 10, 2025). The project on github has been released in April 2025, but the project on Huggingface has been released at the end of August 2025. Additionally, the directory structure of the model on Huggingface is not compatible with the one required by the one used by the project on github.
Let's start again...
If you are a scientist, can you install this (these) model(s) for a "non-commercial scientific research and academic development activities" on a Windows system?
Yes, it is possible, but it is not sure that it is going to work as well as some online demo that you can find elsewhere on huggingface (this kind of links expires very fast).
Also remember that your machine is not the same and the parameters (temperature, top-p sampling, top-k sampling) that you use could be different.
Does it make sense to install this model locally ?
Probably not ...
But how to do that?
Lucky you! Both models can be used with the same modified version of the installation process given on the Github page of Apple.
I'll explain how to use the models at the end, but it's a bit less easy with the github version.
- create a venv and activate it (the project uses numpy<2 (9/9/25) , you don't want to mess with that)
- git clone their github repository
https://github.com/apple/ml-fastvlm
cd ml-fastvlm
- Replace all the references to torch.device("mps") to torch.device("cuda") in predict.py
(At this point, remember that it is no more the code provided by Apple. Also the script on Huggingface is already CUDA based.. (What ?)
- In pyproject.toml (and maybe also in another folder of the project, if you tried to install it before and it failed), remove all references to torch and torchvision in "dependencies”.
- Install cuda, torchvision, torch and the files of the project with a suitable command line:
python.exe -m pip install --upgrade pip
pip install wheel
pip install -e . torch torchvision --extra-index-url https://download.pytorch.org/whl/cu128
Now this is where it will be different with the way you make queries on the model on huggingface.
For the github version, check the "model zoo" (on github) then download and extract the directory somewhere from the zip file.
What matter for the --model-path is the directory where "model.safetensors" is.
For me it is in a directory "llava-fastvithd_0.5b_stage2" that I put in the same directory as predict.py
Test the prompt:
python predict.py --model-path FastVLM-0.5B --image-file pingguo_computer.png --prompt "Describe the image."
You may get the error: AttributeError: 'NoneType' object has no attribute 'image_mean' if there is a problem with the directory that you have selected.
Which directory ? No idea, make just sure that you use the files provided on github and not on huggingface and that there is no nested directory were the model is instead.
Remember that if you query the model like that, the script needs to reload the model all the time, which is not very efficient.
Now for the model on huggingface: it is much easier and you just have to use the code that is provided here:
https://huggingface.co/apple/FastVLM-0.5B
don't forget to correct the path of the picture in the code:
img = Image.open("test-2.jpg").convert("RGB")
test-2.jpg has to exist.
Why this tutorial, if you could just use the code provided on huggingface ?
Because there, they don't tell you what to install, while on github, they do...
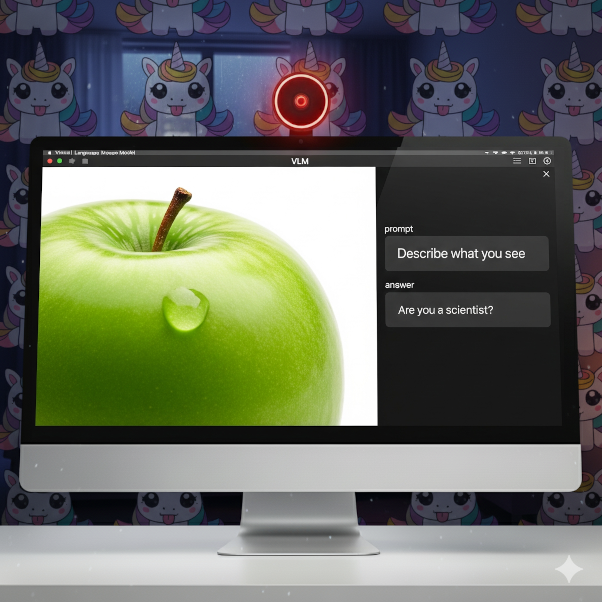
Example of answer with the default scripts:
Github version on pingguo_computer.png: (FastVLM-0.5B)
python hug.py
The image features a computer monitor displaying a digital image of an apple with a single visible drop of juice on its surface. The apple is green and appears to be in a realistic and representational style. The background behind the computer monitor includes a wallpaper of numerous small, animated unicorns with a variety of vibrant and colorful outfits. The unicorns and the overall theme have a playful and whimsical appearance, likely designed to appeal to children.
This image reflects a scene of a computer monitor displaying a screen from what appears to be a game or an interactive application. The background of the scene features a pattern of neon light pink and purple unicorns against a lighter blue background. These unicorns have golden manes and horns and display various expressions, predominantly smiling and laughing. Each unicorn also has a small yellow sun perched on its head. These unicorns are arranged in a background adorned with smaller versions of the same unicorns.
Central to the scene, on the monitor is a close-up of a single, large, green apple. The apple is clearly visible with a single large water
python predict.py --model-path "llava-fastvithd_0.5b_stage2" --image-file pingguo_computer.png --prompt "Describe the image."
The image depicts a computer monitor displaying an apple with a water droplet on its surface. The apple is green and prominently positioned in the foreground, occupying a significant portion of the screen. The water droplet is located near the top of the apple, slightly to the left. The apple appears to be a healthy, fresh green fruit, and the droplet is small and round, reflecting light.
In the background, there is a patterned wallpaper featuring a series of cartoon unicorns. The unicorns are depicted in various colors, including shades of purple, pink, and white, and they are arranged in a repeating pattern across the entire background. The unicorns are stylized with a cute and whimsical appearance, and they seem to be in a playful or fantastical setting.
On the upper left corner of the monitor, there is a prompt box with a red circular icon. The prompt box contains two text fields: "prompt" and "Describe what you see." The prompt text asks the user to describe what they see, and the answer field is blank, indicating that the user has not yet provided an answer.
The monitor itself is a standard flat-screen model, and it is placed on a surface that is not fully visible in the image. The overall scene suggests a casual
***
I made this tutorial because I wanted to test the hype of this model, then I saw some stuffs that I could fix. Plus it should help to reduce the confusion.